Install Hugo
Install Hugo on macOS, Linux, Windows, BSD, and on any machine that can run the Go compiler tool chain.
For full info visit official doc: https://gohugo.io/installation/
Quick Start
hugo new site quickstart
cd quickstart
git init
git submodule add https://github.com/matusstafura/berg-hugo-theme themes/berg
echo "theme = 'berg'" >> config.toml
and to start the server, run:
hugo server
First Post
Create a new post in terminal:
hugo new posts/my-first-post.md
or manually, where you create a directory in content folder named posts and file my-first-post.md.
Fill the content of the file like below and save the file.
---
title: "My First Post"
---

# Hello
now run server:
hugo server
you can visit /posts/my-first-post to see the posts.
Menu
To create menu, edit config file:
You can add:
- menu.main (navbar menu)
- menu.footer (footer menu)
Example:
[[menu.main]]
  name = "Home"
  url = "/"
  weight = 1
[[menu.main]]
  name = "Posts"
  url = "/posts/"
  weight = 2

[[menu.footer]]
  name = "Privacy Policy"
  url = "/privacy-policy/"
  weight = 1
Table Of Contents
To generate a table of contents automatically in Hugo, you can follow these steps:
- Add front matter configuration: Explicitly add the following code to the front matter of your content file (e.g., Markdown file or Hugo archetype):
---
toc: true
---
This configuration tells Hugo to generate a table of contents for that specific content file.
- Configure additional options: To further customize the table of contents generation, you can modify the
config.tomlfile or the relevant configuration section in your Hugo project. Add the following code to the configuration:
[markup]
  [markup.tableOfContents]
    startLevel = 2
    endLevel = 3
    ordered = false
The startLevel and endLevel settings define the range of headings to include in the table of contents. In this example, startLevel = 2 means that headings starting from level 2 (e.g., ##) will be included, and endLevel = 3 means the table of contents will include headings up to level 3 (e.g., ###). Adjust the values according to your specific requirements.
The ordered option controls whether the table of contents will be ordered or unordered. Set it to true for an ordered list or false for an unordered list.
By adding the front matter configuration and modifying the config.toml file, you can automatically generate a table of contents for your Hugo content files based on the specified heading levels.
Settings
To change settings, edit file config.toml.
# Provide Google Analytics 4 (GA4)
# Example: "G-XXXXXXXXXXXX"
# leave empty or omit to disable
googleAnalytics = ""

[params]

  # Upload your logo to the `static` folder
  # Set the path, excluding `static`, or
  # leave the empty string to disable -> ""
  # Example: "/images/logo.png"
  logo = ""

  # Set the path for favicon
  # Example: "/images/favicon.ico"
  favicon = ""

  # Enter number of posts to display per page.
  # Should be an unsigned(bigger than 0) integer.
  # Default is 10
  paginate = 10

  # Enter how many posts to display in
  # shortcode latest-posts
  # Should be an unsigned integer.
  # default is 3
  latestPostsCount = 6

  # Global date format
  # Please DO NOT change the numbers in the date format.
  # It must be 02 for day, Jan or 01 for month, 2006 for year
  # Examples 02 Jan 2006, 01/02/2006, 02-01-2006
  date_format = "2006-01-02"

  # enable or disable the breadcrumbs
  # true or false
  breadcrumbs = false

  # A description of the site.
  description = ""

  # Backlink to the original theme
  createdBy = true

  # custom JS files
  # upload in `assets` folder
  # Example: ['js/_custom.js']
  custom_js = []

  # custom CSS files
  # upload in `assets` folder
  # Example: ['css/_custom.css']
  custom_css = []

  # shows language switcher
  # for multilingual site
  # true or false
  showLanguageSelector = false

  # shows dark mode toggle
  # true or false
  showDarkModeToggle = false

[params.posts]

  # Show prev/next post links
  showPrevNext = true

  # Show profile in posts
  # make sure to set the author name, email, bio
  # and avatar in the author section
  showProfile = false

  # Show Author Name in posts
  # make sure to set the author name in the post
  # otherwise it uses [params.author] if not set
  showAuthor = false

  # Show Date in posts
  # make sure to set the date in the post
  showDate = false

  # Show categories in posts
  showCategories = true

  # Show tags in posts
  showTags = true

  # Show share post in posts
  # [params.social]
  showShare = true

[params.author]
  # Enter your name
  name = ""
  # Enter your email
  email = ""
  # Enter your bio
  bio = ""
  # Enter your profile picture
  # Example: "/images/profile.jpg"
  avatar = ""

[social]
  # enter your twitter handle without @
  twitter = "johndoe"

[markup]
  [markup.highlight]
    style = 'hrdark'

[params.social]

  # What social links to show in the posts
  twitter = true
  linkedin = true
  reddit = true
  facebook = true
  telegram = true

# Third party services
[params.verification]

  google = ""
  bing = ""

[params.plugins]
  # TAG MANAGER Google Tag Manager
  # Enter the full ID (like "GTM-XXXXXX")
  # or leave empty string to disable -> ""
  tagmanager = ""
Shortcodes
Shortcodes are simple snippets inside your content files calling built-in or custom templates. Just add the code to your markdown file.
-
Latest posts vertical
{{< latest-posts-vertical >}}
-
Latest posts horizontal
{{< latest-posts-horizontal >}}
-
Horizontal card
Creates a horizontal card. In markdown call shortcode and add info in
{{< horizontal_card >}}

- ### Button

Creates a button with link

```md
{{< button link="https://www.example.com/" text="Click me!" >}}
Example:
---
title: "My post"
...
horizontal_card:
  enable: true
  feature_item:
    - title: "Headline text"
      description: "This is a description for a horizontal_card"
      image: "images/myproject.webp"
      link: "https://mywebsite.dev/"
      button: "More info here"
    - title: "Second project"
      description: "A collection of tools for everyday use."
      image: "images/second_project.webp"
      link: "https://github.com/repo/repo"
      button: "Public repo here"
---
Link
Creates safe href nofollow link; opens in new window by default. Recommended for external links.
{{< link href="https://www.example.com/" title="source on wikipedia" >}}
FAQ Google Schema
add to frontmatter
---
questions:
  - question: "Question 1"
    answer: "This is the answer to Question 1."
  - question: "Question 2"
    answer: "Here's the answer to Question 2."
---
and then in markdown
{{< faq >}}
Languages
To make site multilingual, see https://gohugo.io/content-management/multilingual/.
Define languages in config file
defaultContentLanguage = 'en'
[languages]
  [languages.en]
    weight = 1
    languageName = "english"
    contentDir = "content/en"
  [languages.se]
    weight = 2
    languageName = "svenska"
    contentDir = "content/se"
Translate
by filename
- /content/about.en.md
- /content/about.se.md
or by directory
- /content/en/about.md
- /content/se/about.md
Deployment
Digital Ocean
If you have a repo of your hugo site, you can have it hosted on DigitalOcean for FREE. DigitalOcean will automatically recognize your repo as Hugo.
-
Create an account on Digital Ocean or sign-in.
-
Click on link
Appsin the sidebar and clickCreate Appon the right.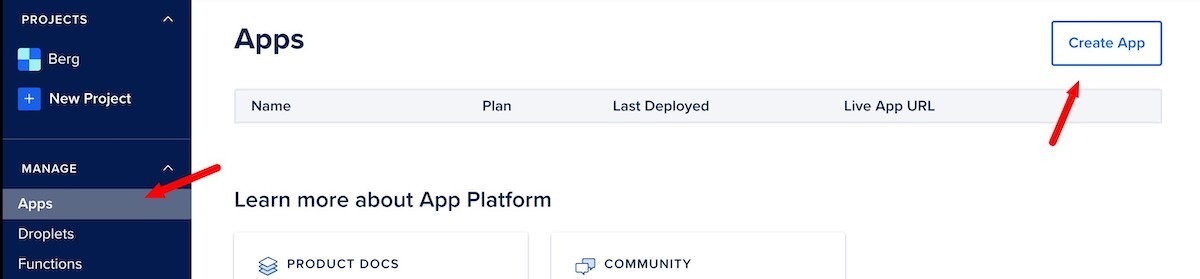
-
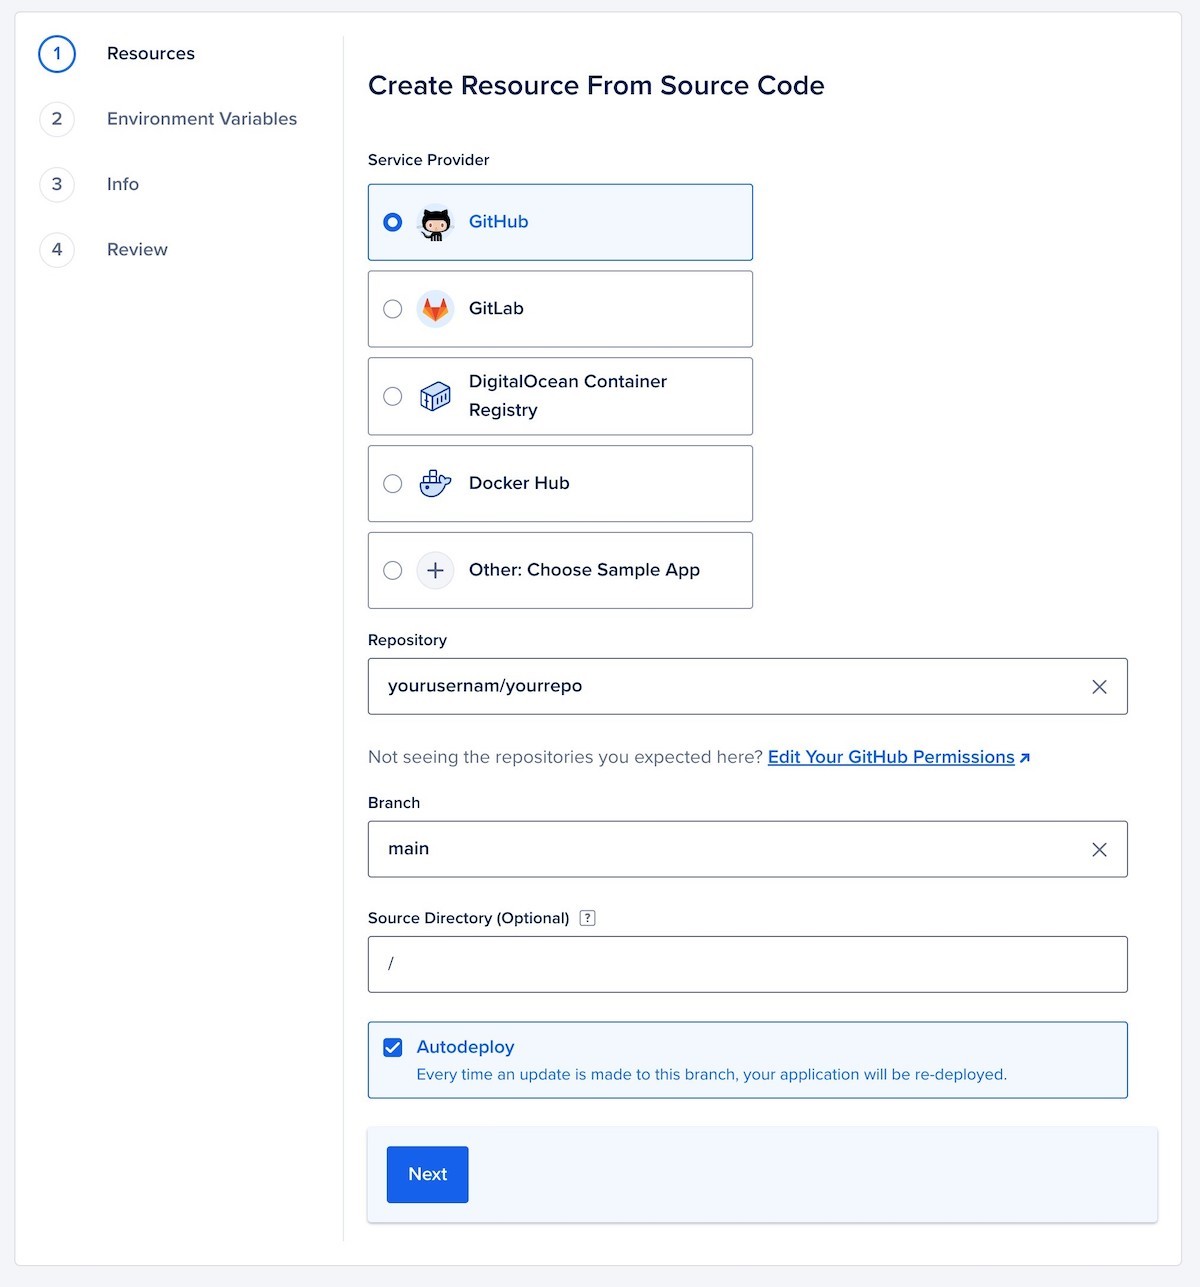
Choose Service Provider.
-
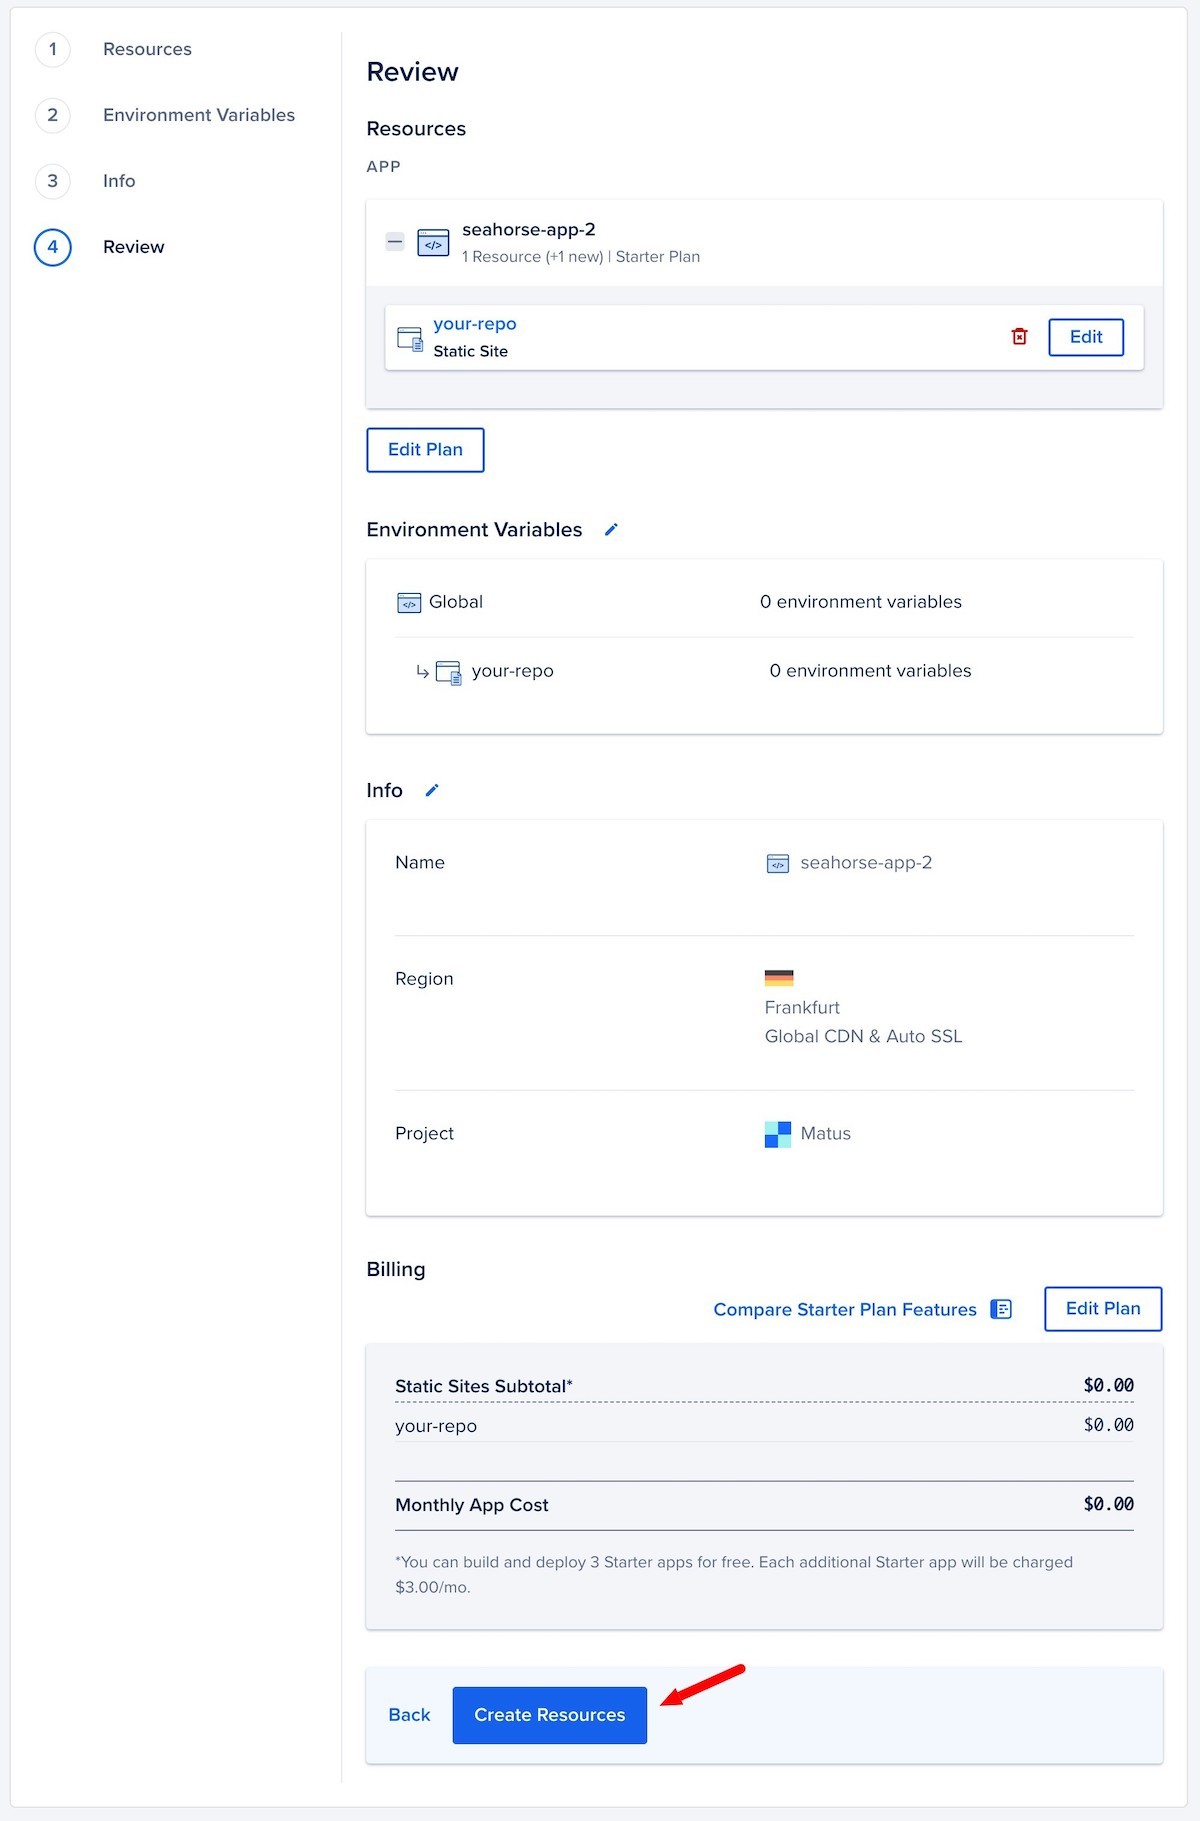
In the review section, click Create Resources.
-
Within few minutes your web will be deployed.
Development
Tailwind CSS
npm run dev
Add webp images recursively in static folder
bash webp.sh